The Beyond Light Quest was first introduced on November 10 2020 and introduced a whole new plot along with the new Stasis power.
This quest came along with the expansion and focused mainly on events that occurred on Europa, introducing a new story involving Variks and the Eliksni.
In this quest, you find out about the new power known as Stasis and begin to attune and later on control it at will while making a huge difference for those on Europa.
There are 34 steps in completing the Beyond Light quest, all of which have been included below along with necessary guides.
Beyond Light Quest Steps
Step 1: Complete The New Kell Mission
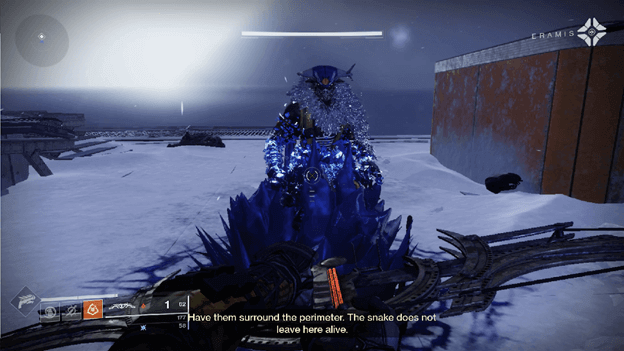
As you first arrive on Europa, The Knew Kell will begin and you will need to follow through with the mission to save Variks from his pursuers.
You will have to fight through various enemies until you find Varik’s location, where you will then need to defend him from more enemies that arrive to attack.
Check out our The New Kell Walkthrough for more info about the mission.
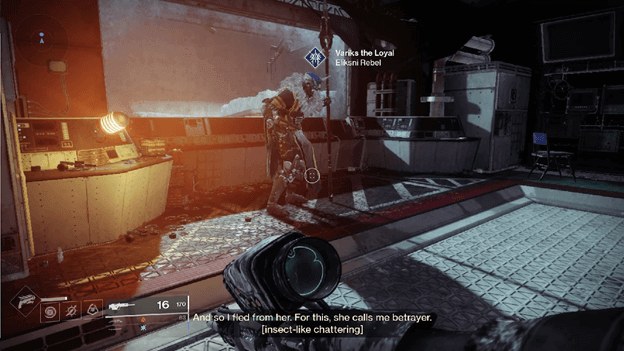
Step 2: Return to Variks to Discuss Eramis’s Growing Power
After you have completed The New Kell, head back over to where Varik’s is holding out and he will explain more about what he mentioned during your first encounter.
Speaking with Varik’s after The New Kell will make the Rising Resistance mission available and will provide you with the next step of the quest.
Step 3: Complete the Rising Resistance Mission
The next step involves the completion of the Rising Resistance mission, which involves you aiding Variks with setting up a communications network.
This communication network will be the key to Varik’s reaching out to those who do not wish to fall under Eramis’ control.
For more information about the mission, check out our Rising Resistance Walkthrough.
Step 4: Speak to the Exo Stranger
A cutscene will play when you are at the end of the Rising Resistance mission and you will encounter the Exo Stranger afterward.
Once the cutscene is over, you will need to Speak with the Exo Stranger, who will give you a Splinter of Darkness for you to later attune.
Step 5: Attune the Splinter of Darkness
Once you have the Splinter of Darkness, you will need to bring it to the nearby Ziggurat to start up its power.
You will then need to search for the Crux of Darkness in Nexus to attune the Splinter of Darkness, giving you a taste of the Stasis power.
Step 6: Commune with a Crux of Darkness in Nexus
Follow your waypoint heading towards Nexus and enter it where you will find the Crux of Darkness, which you will need to interact with to start the attunement.
You will start to surge with almost unlimited Stasis power and will need to kill all of the enemies in the area as well as those that spawn to complete this step.
Once finished, you will start to power down and need to test out its ability to unlock Stasis-locked chests.
For more details on this step, check out our Beyond Light Splinter of Darkness Quest walkthrough.
Step 7: Secure Stasis Locked Chest in Nexus
There will be a Stats-locked chest nearby which you will need to head over to, unlocking it in the progress after removing a Stasis-locked barrier.
This introduces the ability to unlock specific chests which require you to have an affinity with the new Stasis element later on in the game.
Step 8: Regroup with Variks in Charon’s Crossing
Once you have gotten a taste of the darkness, you will need to head back to Variks to continue with the quest.
You can easily reach him by fast-traveling to Charon’s Crossing and finding him at the location where you first met up.
Variks will be slightly uneasy about you wielding the new power but hopes that you will be able to use it against Eramis.
Step 9: Defeat Fallen in Eventide Ruins in a Single Life
Your next step will be to head over to the Eventide Ruins where you will need to defeat a vast amount of Fallen to proceed.
You will need to defeat 35 Fallen enemies without dying in the Eventide Ruines, other factions will not add to the counter.
Step 10: Draw out and defeat Elenaks, Salvation Elite
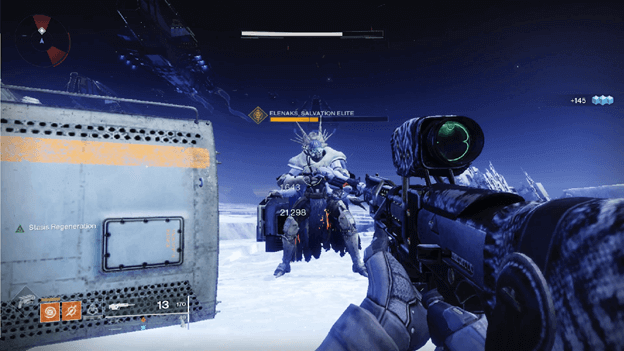
Your next task will be to head to Asterion Abyss and find a way to get the attention of Elenaks, Salvation Elite.
You will need to head to the location and find the enemies (they will be marked targets) who you need to defeat.
After defeating a certain amount of these marked targets, Elenaks, Salvation Elite will appear nearby and you will need to confront and defeat them.
Step 11: Complete “The Warrior” Empire Hunt
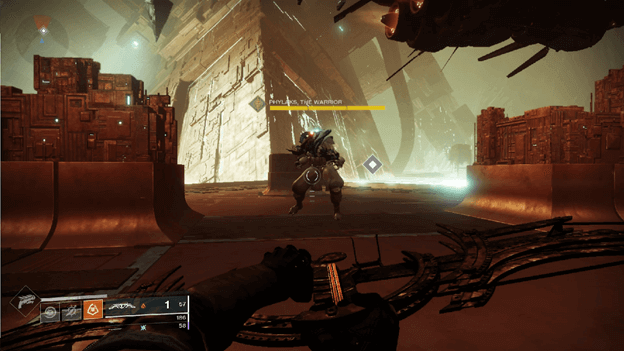
The next step requires you to complete an Empire Hunt called The Warrior which is similar to strikes in a way but focuses on you fighting top members of Eramis’ army.
You will have to fight through several levels to reach Phylax, The Warrior, and continue to face them through 3 different stages.
For a complete guide on this Empire Hunt, we have prepared our The Warrior Empire Hunt Walkthrough just for you.
Step 12: Return to Exo Stranger in Beyond
After defeating Phylaks, The Warrior, you will need to head back and discuss your victory with the Exo Stranger, who you can reach by fast traveling to Beyond.
Step 13: Attune Splinter of Darkness
Similar to what you did when you first went to attune the Splinter of Darkness, you will head to the Ziggurat once more for the next attunement.
Interact with the marked object and start the attune process, which leads you to the next area where you will commune.
Step 14: Commune with Crux of Darkness in Bray Exoscience
You will need to proceed to the Bray Exoscience to commune with a different Crux of Darkness to further develop your new Stasis abilities.
You can save time by fast-traveling to Charon’s Crossing before making your way to the waypoint on your vehicle.
The Bray Exoscience appears to be a lab of some sort and the Crux of Darkness will be located within this area.
Interact with the Crux of Darkness just as you did with the previous one, kill all the enemies and end it by interacting with the Crux once more.
For more info on the Bray Exoscience Splinter of Darkness Quest step, you can check out our guide.
Step 15: Regroup with Variks in Charon’s Crossing
After attuning your Splinter of Darkness at the Bray Exoscience, head back to Variks by fast traveling (to make it faster) and proceed with the next step of the quest.
Step 16: Collect Tracking Devices in Asterion Abyss
Your next task will be to find a specific amount of Tracking Devices which drop from Vex enemies located in the Asterion Abyss.
Head to the Asterion Abyss and kill Vex enemies until you collect a total of 10 Tracking Devices which you will need later on.
Step 17: Locate and Shut Down Vex Conflux in Cadmus Ridge
Your next step is to shut down the Vex Conflux which is in the Cadmus Ridge but before doing so you will have to have Ghost scan it by interacting with the object.
While Ghost is scanning, you will need to defend him as Vex forces continue to spawn in the area, attempting to stop you.
To take down the Vex Conflux, you will need to defeat a certain number of enemies until a crystal (3 in total) from each area becomes vulnerable for you to destroy.
For a walkthrough on how to complete this, check out our guide on How To Shut Down Vex Conflux.
Step 18: Complete “The Technocrat” Empire Hunt

Your next step in the Beyond light quest will be to take down Praksis, The Technocrat, who is somewhat Eramis’ technology expert.
Taking out Praksis will prevent Eramis from being able to empower her other minions with the Darkness, which will advantage when facing her army.
You will have to head over to the starting point of The Technocrat Empire Hunt to start this activity and complete it to move on to the next step of the quest.
For a guide on this Empire Hunt, you can check out our The Technocrat Empire Hunt Walkthrough.
Step 19: Return to your camp in Beyond
After defeating the Technocrat, you will need to head back to the camp in Beyond and to your surprise, Zavala will be waiting.
He will discuss the current situation with you and instead of being angered by the secret of you taking up the Darkness without prior permission, he will give you a tip.
Step 20: Speak to Shaw Han in The Steppes
After speaking with Zavala, your next destination will be back at the origin of where you started in Destiny 2, The Steppes.
Your next task will be to head over to Shaw Han and discuss your next move as there has been a discovery related to the situation which leads to the Cosmodrome.
Step 21: Defeat Fallen in the Cosmodrome, The Divide
It appears that Shaw has discovered Eramis trying to recruit members from the House of Devils, her old comrades.
Eramis’ is using one of her warriors, Bakris, the Adamantine to show their power and hoping that the House of Devils sides with them.
You are tasked with defeating the Fallen nearby in the Cosmodrome within the Divide to obtain Intel which will provide valuable data for stopping Eramis’ plans.
Step 22: Eliminate Bakris, The Adamantine
After gathering Intel, it is understood that Bakris, the Adamantine, is lurking around in the Exodus Garden 2A Lost Sector.
In order to put a stop to Eramis’ plan, you will need to head to Garden 2A and defeat Bakris, the Adamantine, who will be accompanied by the original enemies within the Lost Sector.
Defeating Bakris will put a stop to Eramis’ recruiting and this reaches Eramis’ making her displeased with the current events.
Step 23: Complete “The Glassway” Strike
Out of desperation, Eramis now intends to use the Vex as a weapon against her enemies, seeking out a portal to activate which will allow the Vex to flood Europa.
Your next step will be to head over to Europa and complete a strike called The Glassway, preventing the invasion from pushing through.
For a guide on how to do the strike, check out our The Glassway Strike Walkthrough.
Step 24: Return to the Exo Stranger in Beyond
After doing The Glassway strike, you will need to head back to the Exo Stranger who has a word about the Darkness power you are delving into.
She explains how it can change the one who uses it but also believes that it is controllable and has high hopes for you to attune your well.
Step 25: Attune Your Splinter of Darkness in Beyond
After defeating Praksis, your Splinter of Darkness has become stronger and now you must attune it once more.
Once again, head to the Ziggurat so you can begin the attuning process, making your Splinter of Darkness stronger and gaining more control over it.
Step 26: Commune with The Crux of Darkness in Riis-Reborn Approach
Your next step will be to head over to Riis-Reborn Approach where the next Crux of Darkness will be located.
Head to the marked location (fast travel to Charon’s Crossing to get there faster) and make your way into Riis Reborn Approach.
You will once again commune with a Crux of Darkness to attune the Splinter of Darkness for more control over the power of Darkness.
You can check out more here on the Riis-Reborn Approach Splinter of Darkness quest step.
Step 27: Regroup with Variks in Charon’s Crossing
After attuning, head back to Variks by fast traveling to Charon’s Crossing and speak to him once more to proceed to the next step.
During your conversation with Variks, he speaks of how he wanted to follow Eramis in the past but she was blinded by anger, which is why she cannot save the Eliksni.
Step 28: Ensure Allied Skiff Escapes Europa
As the Eliksni prepare to evacuate, they are getting caught up by attacks from Eramis’ army and you will need to ensure they safely escape.
The Allied Skiff will be held back by Field Emitters which you must deactivate by clearing out the enemy forces and obtaining Field Emitter Codes from specific enemies.
For more detail about this step, check out our guide on How To Save Allied Skiff On Europa.
Step 29: Complete “The Kell of Darkness” Mission

After finally putting the Eliksni out of harm’s way, it is time for you to put a stop to Eramis and her plans once and for all.
This step requires that you complete The Kell of Darkness mission, where you will face Eramis in combat using your newly mastered Stasis abilities.
Step 30: Return to the Exo Stranger in Beyond
With Eramis finally defeated, you will now head back to the Exo Stranger to wrap things up and finally take full control of the Stasis power.
The Exo stranger will instruct you to attune once more and fully embrace the new power that you have now had full control of.
Step 31: Attune your Splinter of Darkness Final Stasis in Beyond
The final attunement of your Splinter of Darkness awaits and you will for the last time head to the Ziggurat to perfect it.
Head over to the Ziggurat and interact with the last piece to finalize your hold on the Darkness power known as Stasis.
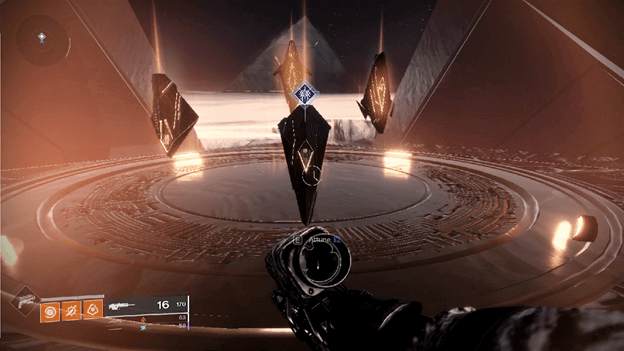
Step 32: Embrace the Power of Darkness
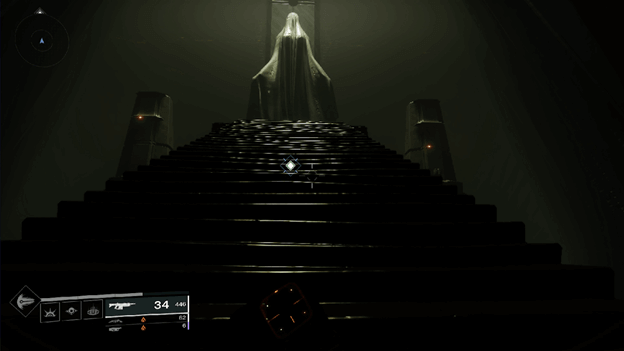
Head up to the final piece and interact with it to attune the Splinter of Darkness, which teleports you into a temple-like atmosphere.
There will be a shrine at the end with a statue which you will need to interact with, which has the action “Embrace the Darkness Within” which you will need to do to move to the next step.
After you have embraced the darkness, the Stasis subclass for your character will now be unlocked and available for use in the game.
Step 33: Return to Exo Stranger
Once more you are to return to the Exo Stranger and she will finally tell you the truth about how everything comes into place, including her being from another timeline.
The No Time To Explain Pulse Rifle is available as an Exclusive Reward after speaking with the Exo Stranger.
Step 34: Return to Tower and Speak with Zavala
After speaking to the Exo Stranger, your next step will be to head back to Zavala to report your success on Europa.
Speaking with Zavala at the end of the Beyond Light quest will allow you to accept the Reclaiming Europa quest.