
Nataruk is a bow that belonged to Hunhow, forged from the remains of Sentient warriors into a powerful tool of death.
You can charge the Nataruk’s shots to deal increased amounts of damage, which also improves the Critical Chance and Status Chance of the weapon.
Charging the weapon can reach a Perfect Charge, further increasing the stats to even greater amounts for maximum damage to enemies.
When charging there will be a bar on your reticle to show when to release to do a perfect shot, the charge rate can be modified by mods for faster release.
Before checking our Nataruk build below you can read our guide about How to Get Nataruk
Nataruk Builds
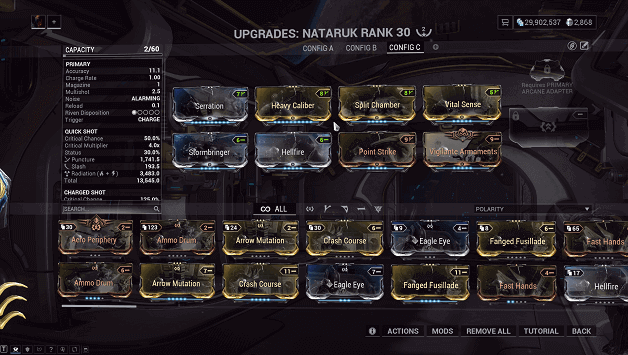
1) Hybrid Build/Critical and Status Build

Given that the Nataruk has a high Status Chance and unlimited ammo, it seems that it would be too easy to go over 100% Status Chance and fire endless numbers of arrows.
Each hit when charged should guarantee a good chance to proc Status Effects while you can also deal critical damage.
With this build, you will be weakening the enemies, damaging them over time, and hitting them with critical blows, adding up to devastate any enemy.
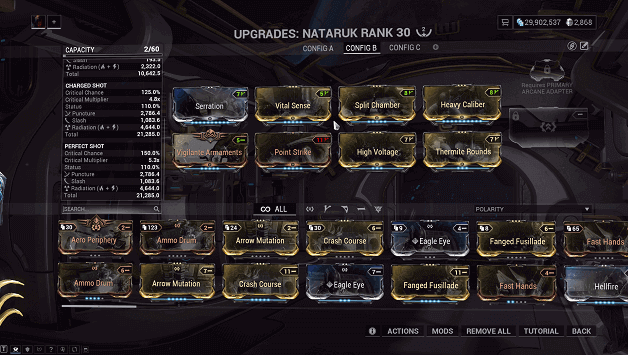
2) High Damage Build/Elemental Critical Build
Focusing more on the Critical Chance aspect of the Nataruk, we included critical mods and added a pair of Elemental Mods for damage.
The multishot of Split Chamber and Vigilante Armaments plays a big part in allowing you to release multiple projectiles to hit enemies several times.
Charging up should guarantee a critical strike while Perfect Shots can deal even more damage to enemies hit.
Also read below our other weapon builds guide
- Verdilac Build Guide
- Venato Build Guide
- Rumblejack Build Guide
- Nepheri Build Guide
- Vitrica Build Guide
- Korumm Build Guide
3) Hybrid Build/Critical and Status Build
Nothing beats a good combination of having 100% Critical Chance and Status Chance, causing nothing but destruction for your enemies.
With this build, perfectly charged shots will have a 150% Critical Chance and 110% Status Chance, guaranteeing your critical strikes and inflicting Status Effects.
Not only are these guaranteed but they can occur multiple times due to the Multishot properties of the build.