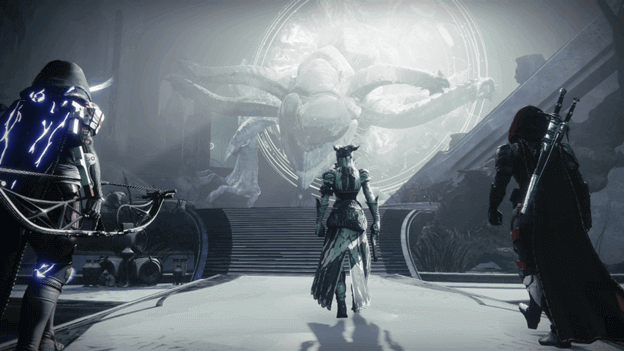
Enemies have invaded Riven’s Lair and are fighting over its claim, which makes it up to the Guardians to defend it and eliminate these threats.
Riven’s Lair is the Seasonal Activity for the Season of the Wish that Guardians can join to enter the Ahamkara’s very own dungeon.
There will be challenges such as enemies and traps that need to be surpassed before taking on a final boss at the end of the activity.
How To Start Riven’s Lair Activity?
The Riven’s Lair activity begins once you have progressed through the earlier parts of the Season of the Wish, which is after the introductory mission and quest.
Once Riven’s Lair is unlocked, you can start it by opening the Destination Menu and selecting it after picking the H.E.L.M.
Starting Riven’s Lair will set you up with matchmaking, which will allow you to play with other Guardians if any are available.
Riven’s Lair Portal Choices
While each run of Riven’s Lair may have different mission names, they are all in the same location but the path you choose will decide what challenges you will be facing.
There will be 3 portals that you can choose from, and these may be activated by standing on one of the nearby plates at the start of the activity.
- Spike Trap Portal (Left) – Explore the different rooms in the lair and get past the spike traps and platforms to fight a boss called “Aspirational Construct” (Left Portal)
- Pervading Darkness Portal (Middle) – Travel through the lair and survive the Pervading Darkness by approaching light wells as you defeat “Ungoloth, Wayward Beast.”
- Poison Pool Portal Right – Quickly get past pools of poison as you make your way through to reach the end where you fight a boss called “Locus of Subjugation.”
Riven’s Lair Activity Walkthrough
Riven’s Lair consists of a series of tasks to be done before you can fight the final boss, who must be defeated for you to claim the rewards at the end.
1) Choosing A Path
You will be starting in the Spirit’s Anchor, where there will be 3 portals to choose from and this can be done by stepping on one of the plates near them.
Once a plate has been stepped on, this will permanently activate the path for the rest of the activity until you finish or leave.
2) Traverse Through the First Plate Area
After going through the first portal, you will need to proceed by following the waypoint to the next area and this will take you to a challenge based on what path you have chosen.
You will need to either avoid spike traps, approach light to remove pervading darkness, or jump across pools of poison.
This must be done until you find 3 plates and step on them to open a portal going to the next area, which you must enter.
3) Fight Through Enemies
The next area will often have enemies that you will need to clear out but there will sometimes be a catch to it such as defeating certain enemies or completing a different challenge.
Upon completion of the area, you will need to go through the next portal which will put you to the task of opening another portal by activating 3 plates again.
4) Traverse Through the Second Plate Area
Like what you did earlier, you will need to make your way through the area by stepping on 3 plates to get a portal going.
Enter the portal once all 3 plates have been stepped on and this will bring you to another area where more fighting will happen.
5) Defeat the Boss
In the last area, you will need to defeat a boss which will require that you also fight some of their minions to make them vulnerable.
Each boss can be defeated in a certain way, which mostly includes defeating their minions to make them weak.
6) Collect the Rewards
After defeating the boss, a door will open, and this will allow you to collect the loot from the activity before it ends.
Riven’s Lair Bosses
1) Aspirational Construct
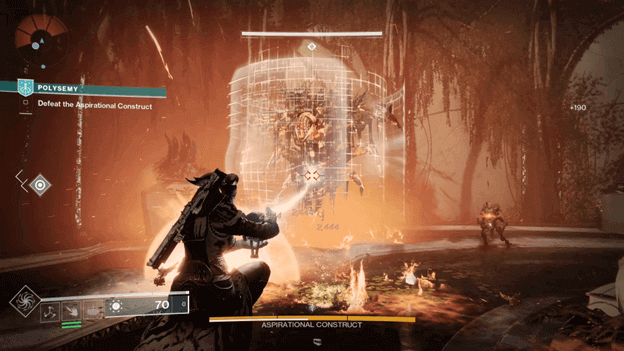
The Aspirational Construct resembles a Vex Hydra and will be immune to damage until you take out its shield. (Represented by the white health bar)
To get rid of its shield, you will need to defeat an Arc-Charged Minotaur to get an Arc Cranium, which fires a laser that damages its shield.
After taking out the Aspirational Construct’s shield, you can freely damage it as if it were a regular Hydra but with more health.
2) Centroidal Mind
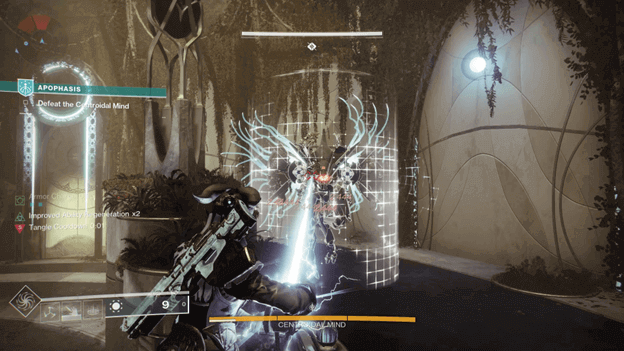
The Centroidal Mind is a Vex Hydra that has a shield encircling it similar to the Aspirational Construct but can sometimes be more aggressive yet slow.
To attack the Centroidal Mind, its defenses must be brought down as well by using an Arc Cranium on it, which drops from the Arc-Charged Minotaur enemies.
Once its shields have been taken out, you and your fireteam can easily take it down but it would be best to reduce some of its minions first.
3) Ungoloth, Wayward Beast
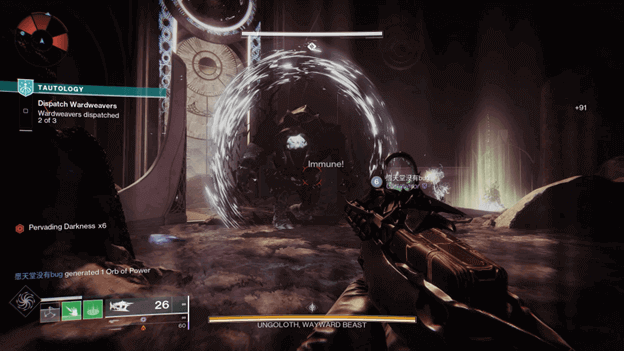
Resembling an Ogre, Ungoloth the Wayward beast is protected by its Ward Weavers and there will be a total of 3 of them in the area.
Ungoloth will be immune to damage, and you will take out his Ward Weavers before any damage can be done to him.
Once the Ward Weavers are gone, you can freely attack Ungoloth but he is still tough, so be careful when fighting close to this boss.
4) Locus of Subjugation
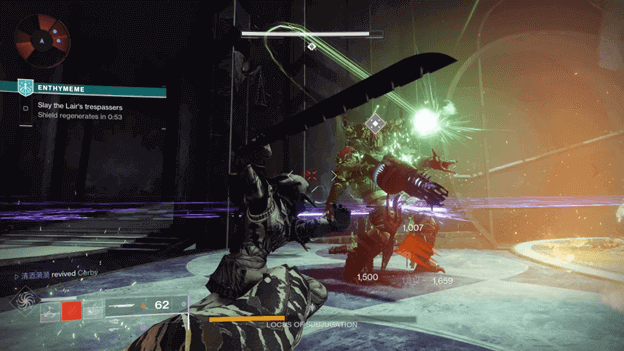
The Locus of Subjugation resembles one of the Scorn enemies that you encounter and is invulnerable until you have defeated the Mephitic Hosts.
These enemies need to be defeated and will be marked by waypoints, but they will also be accompanied by other enemies.
After defeating the Mephitic Hosts, you will be able to fight the Locus of Subjugation until a shield regenerates, which will require that you take it down again.
Verdict
Riven’s Lair is one of the fastest activities that were introduced throughout the many seasons of Destiny 2 and players can grind this to get gear and XP quickly.
While some paths may be easier for other players, everyone has their preferred path to take, and it is best to choose yours quickly if you’re aiming to speedrun things.
To make things challenging though, the bosses will often be at random, which means it’s important to be ready to take them with your best loadout.