This is a step-by-step guide that will show you how to install custom graphics in Football Manager 2021, this includes Logos, Kits, Facepacks, Background, Match Balls and Pitch Textures.

Introduction
Welcome to the latest version of the Football Manager Graphics Installation Guide.
This guide will show you how to install the most common types of graphics into Football Manager.
In addition the instructions unless stated are generally the same regardless of whether you are using the Steam, Epic or Gamepass version of the game, are gaming on Windows, Mac or Linux or purchased a disk or digital copy of the game.
Please note you are advised as always to run a virus scan on any file downloaded from the internet. Sports Interactive or SEGA have no control over third party content and as such third party downloads are used at your own risk.
It is also advisable to read any instructions on the download page for the content you are installing (or found in the readme that comes with the download) as they may contain any extra instructions that are specific to that file. This is especially important for multi-part mega-packs that may need to be extracted in a certain order.
How To Install Graphics
This part of the guide will cover how to install 3D kits, 2D kits, facepacks, logos, trophies, backgrounds and stadium pictures and whilst each of these packs are slightly different the instructions to install them are exactly the same.
After you have downloaded a file it will generally come in one of three formats: zip, rar or 7z file.
Zip files should be automatically supported by your OS and may show up as compressed folders, Rar and 7z files may require you to download some software to extract the files, the below software is recommended:
Windows: 7-Zip[www.7-zip.org] (Choose the most recent .exe)
MacOS: The Unarchiver[wakaba.c3.cx]
Linux: If you are using Linux hopefully you know how to download and locate programs for Linux already.
7-Zip is installed using the .exe you download, following the instructions on-screen. To install The Unarchiver simply double click on the .zip file you download from their website then drag the program it extracts (called ‘The Unarchiver’) into your apps folder.
Once installed, create a new folder somewhere you can keep track of (on your desktop for instance) and place your downloaded graphics zip, rar or 7z in it. Now we extract:
Windows: Right click on your zip, rar or 7z. Choose 7-Zip from the menu, then select ‘Extract Here’.
MacOS X: Right click (or ctrl + click) on your zip, rar or 7z. Choose ‘open with’ then select ‘The Unarchiver’.
Your file should extract and most probably create a folder in the same directory.
If you extracted an fmf file (or just straight downloaded one) this isn’t a problem, these are just files that have been packed using the FM Resource Tool, and as an end user there is no need for you to mess around extracting these files, just think of these as the same as the folder you’d get from extracting the files.
Locating Your User Data Location
Once you have downloaded and extracted your files, you now need to move them over to your User Data Location so they can be read by the game.
First make sure you have run the game at least once (just getting to the start menu and exiting is fine) so the game can create the required folders for you.
By default your User Data Location is located within the Documents\Sports Interactive\ folder. Inside this folder will then be a Football Manager folder for each version of FM you have run on that computer.
You just need to open the Football Manager folder that corresponds to the version you are using.
FM TOUCH USERS: You’ll need the Touch folder by default.
GAMEPASS/MICROSOFT STORE USERS: If you are using this version of the game then your User Data Location is in a slightly different folder, you’ll need to open the Football Manager folder for the year of the game you are using and inside this folder you’ll notice a Gamepass folder and this is the folder you need.
After you have opened the correct Football Manager folder you should see a list of folders and what you need to do is locate the folder called graphics, if this folder doesn’t exist then just create a new folder and call it graphics.
Now open up your graphics folder and place the files you extracted inside it.
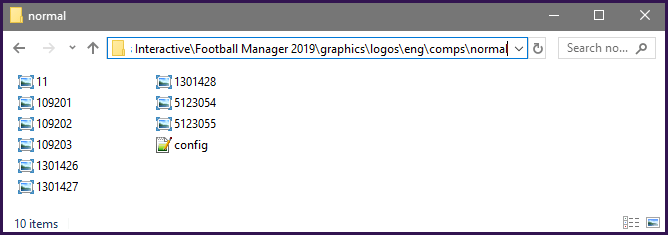
For the most part the sub-folders you put the graphics into doesn’t matter, though it is best to separate the different types into their own sub-folders so you don’t accidentally overwrite your kits with logos for the same teams. The thing to watch out for when organizing are the config xml files. These are vital and should not be mixed and matched. A set of graphics will come with a config file that is unique to them in the same folder. Make sure they stay together, in the same folder and that new png files or config files are not added or overwritten into their folder.
Whilst for best results try to keep the folder names short and simple and avoid special characters where possible.
For example below is a screenshot showing what a typical end folder should look like if done correctly, note you have a config file along with several graphic files, with a short simple folder structure that stops you from accidentally overwriting the config file when installing other graphics:
Displaying Graphics in-game
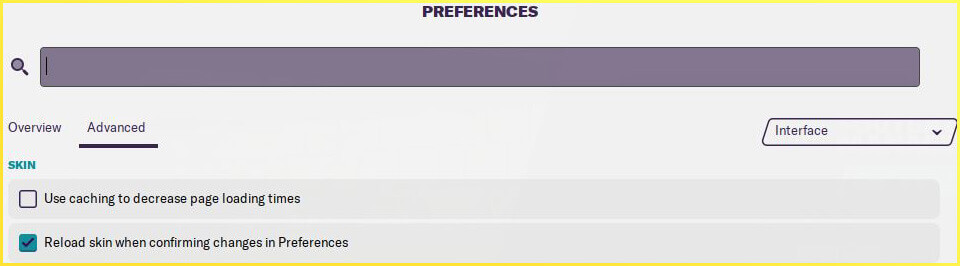
Once you have added the graphics you wanted load up the game, and go into the Preferences Menu.
Then you can either select the Advanced option on the left and on the top right drop down select Interface, then scroll down the Skin section and untick Use caching to decrease loading times and tick Reload skin when confirming changes in Preferences.
Or in the search bar at the top type in Skin and in the listed results untick Use caching to decrease loading times and tick Reload skin when confirming changes in Preferences.
Next select confirm and your new graphics should now display. (Once the graphics are loaded and you aren’t planning on adding any more you can turn the skin cache back on and untick the Always Reload button.)
If you want to add more graphics then just repeat the above steps, just making sure you put each pack you install into it’s own folder so you don’t accidentally overwrite the config files from your earlier packs.
How To Install Other Stuff
It is also possible to replace other items in Football Manager, for the most part these are installed into various folders within your User Data Location.
First make sure you have run the game at least once (just getting to the start menu and exiting is fine) so the game can create the required folders for you.
By default your User Data Location is located within the Documents\Sports Interactive\ folder. Inside this folder will then be a Football Manager folder for each version of FM you have run on that computer.
You just need to open the Football Manager folder that corresponds to the version you are using.
FM TOUCH USERS: You’ll need the Touch folder by default.
GAMEPASS/MICROSOFT STORE USERS: If you are using this version of the game then your User Data Location is in a slightly different folder, you’ll need to open the Football Manager folder for the year of the game you are using and inside this folder you’ll notice a Gamepass folder and this is the folder you need.
After you have opened the Football Manager 2021 folder you should see a list of folders and what you need to do is locate the relevant folder for the item you are wanting to install, below I have listed some common examples, for other items you are best checking the site or thread where you downloaded the item from as they should have provided installation instructions.
If the below folders don’t exist (and they generally won’t) then just create them and once done place your extracted files in the folder indicted below:
3D Match Ball
\mesh\ball\
Pitch Textures
\textures\pitch\
2D Match Ball
\textures\match_icons\
2D Winter Match Ball
\textures\match_icons\winter\
Also note it is generally recommended to replace these items whilst the game is not running as refreshing the skin doesn’t tend to refresh the match related files.
Once you have added what you want then load up the game and go into the Preferences -> Interface menu and untick ‘Use Caching to decrease page loading times’ and tick ‘Reload Skin when confirming changes in Preferences’ then select confirm and your new graphics should now display. (Once the graphics are loaded and you aren’t planning on adding any more you can turn the skin cache back on and untick the Always Reload button.)
How to Transfer Files from a Previous Version
Nearly all user created graphics can be transferred from one version of Football Manager to the next, the exceptions are:
– Skins, skins can only be used for the version of the game they were made for. It may seem that a skin from last year may initially work on the new game, however when you get to a new screen you are likely to get a broken/blank screen at best or even possibly you’ll cause the game to crash, so it is best to wait for the skin maker to update the skin (or make your own with permission).
– 3D kits were changed again with FM18, so if you are using FM18 on-wards you will need kits made using templates for that game on-wards, if you are playing an older version then you will need pre-FM18 templates.
– Graphics that are released in the fmf format might not work across versions, if the later version of Football Manager cannot read the fmf files you’ll need to use the Resource Tool from the previous to extract the contents of the fmf file, and then either keep them extracted and treat as normal files or repack them using the Resource Tool from the current version.
There are two ways of transferring your graphics between versions of Football Manager;
1. Manually move your graphics folder (or the folders that contain the stuff you want transferring over) from the User Data Location of the current Football Manager, to the same location within the User Data Location of the new Football Manager. When transferring content over make sure it keeps the same folder structure (unless instructed otherwise).
2. Change the User Data Location of the new version of Football Manager to point to the location you were using for the current version. (Note if doing this you might want to move none graphical user files to another location to save you accidentally overwriting them with the new edition or you causing problems by trying to read older version files in the current edition.)
Once you have done that then:
Go into the Preferences -> Interface menu and un-tick ‘Use Caching to decrease page loading times’ and tick ‘Reload Skin when confirming changes in Preferences’ then select confirm and your new graphics should now display. (Once the graphics are loaded and you aren’t planning on adding any more you can turn the skin cache back on and un-tick the Always Reload button.)
Apart from this guide, if you want us to cover any other guide related to the game “Football Manager 2021” do let us know in the comment section. We’re happy to do that for our readers.
Written by: michaeltmurrayuk